WPXFacets Documentation
Set up WPXFacets on a WooCommerce store, connect the managed search service and configure filters and search. Admin labels are quoted as they appear in WordPress.
Getting Started
Seven steps take a store from a fresh install to working filters. Steps 2 to 5 connect a managed search environment from your WPXFacets subscription. Without one, WPXFacets filters through WP Query, directly on your WordPress database.
Install the Plugin
- Download the plugin ZIP file from your account dashboard on wpxfacets.com.
- In WordPress, go to Plugins → Add Plugin and click Upload Plugin.
- Choose the ZIP file and click Install Now, then Activate Plugin.
An XFacets menu appears in the admin sidebar with four screens: Filters, Elastic Server, Sync and Settings.
Activate Your License
Your license key and token are in your WPXFacets account:
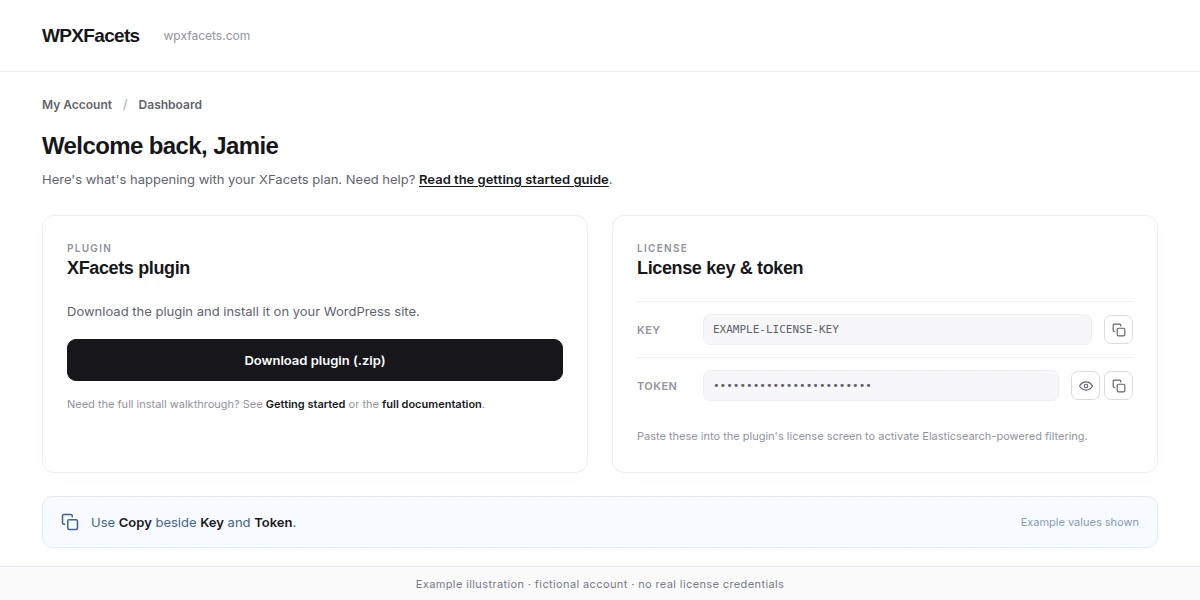
- Sign in at wpxfacets.com/my-account with your WPXFacets account and open Dashboard.
- In the License key & token card, click Copy beside Key and, separately, beside Token. The token stays masked on the website; Copy copies its full value.
Then activate the license in your store:
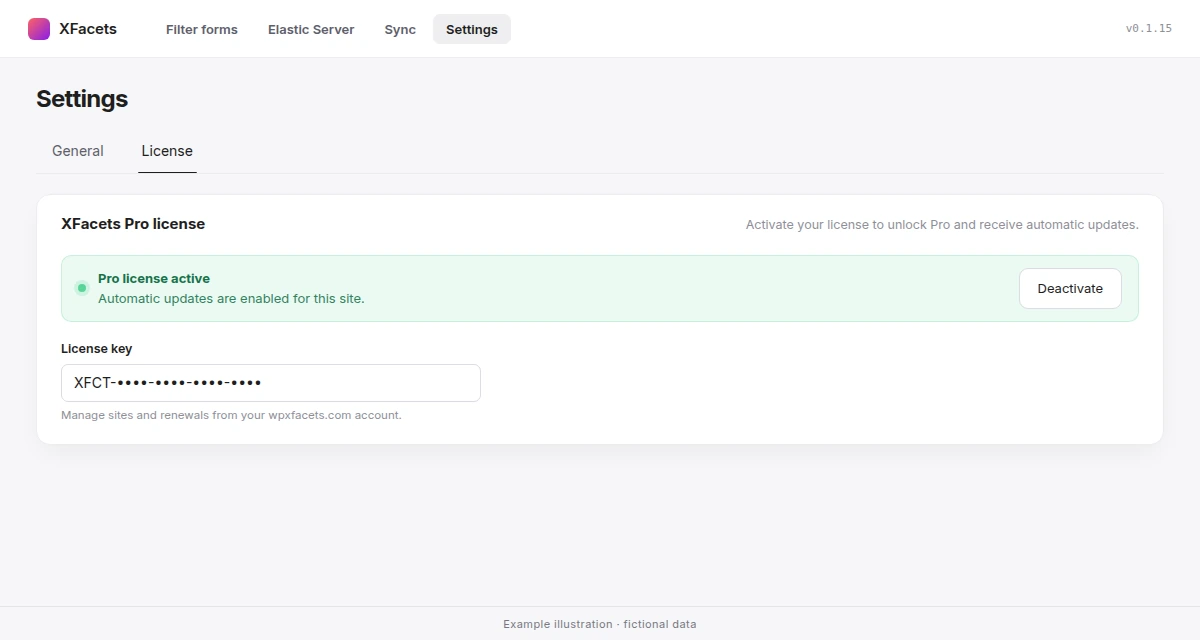
- In WordPress, go to XFacets → Settings and open the License tab.
- Paste Key into License key and Token into License token, then click Activate License.
When the banner shows Pro license active, automatic updates are enabled for this site and you can choose a managed environment.
Connect the Managed Environment
WPXFacets reaches its managed Elasticsearch service through the managed gateway. There is no server URL, user name or password to enter: Elasticsearch credentials are never stored in the plugin.
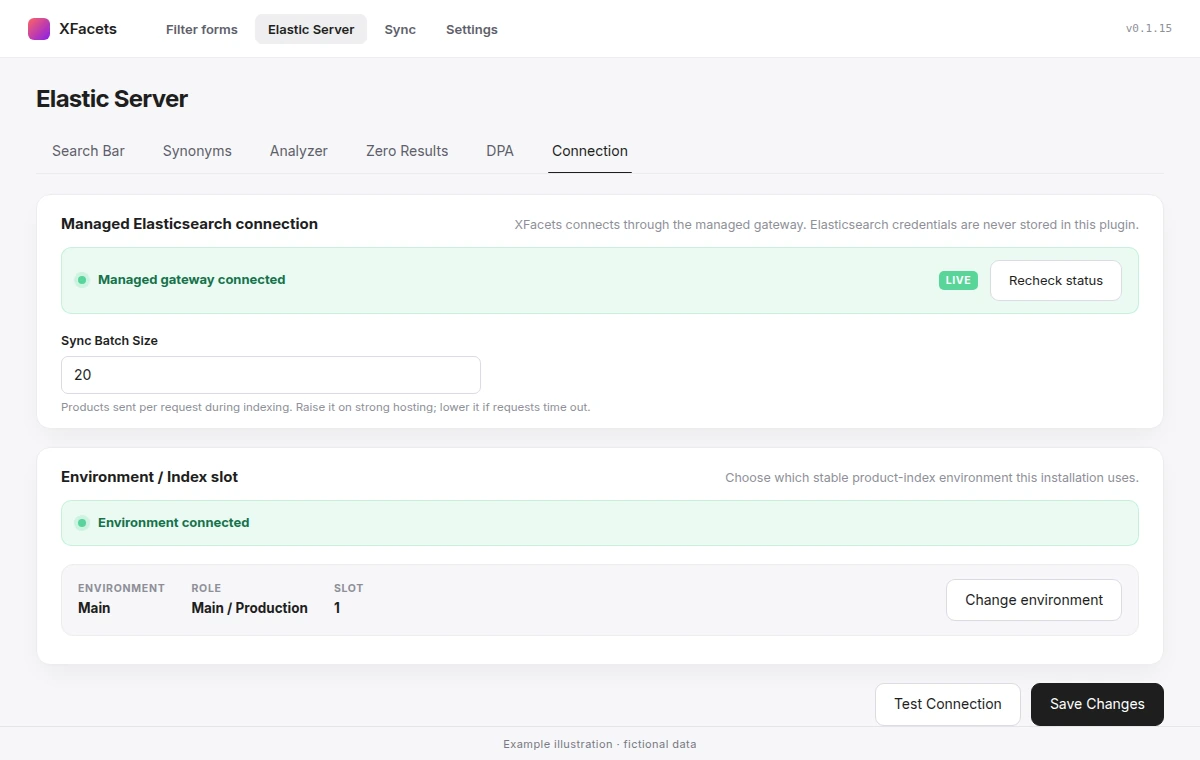
- Go to XFacets → Elastic Server and open the Connection tab.
- Under Environment / Index slot, choose an environment in Select environment and click Use environment.
- Check that the Managed Elasticsearch connection card shows Managed gateway connected. Recheck status and Test Connection check it again.
Each environment has a role: Main / Production for the live store, Secondary for others such as staging. Changing an environment later asks for confirmation and requires a new full sync. Sync Batch Size on the same tab sets how many products are sent per request during indexing: raise it on strong hosting, lower it if requests time out.
Moved in version 0.1.15
The connection settings used to be under Settings → Elastic Server. They are now in Elastic Server → Connection, and old bookmarks open the new tab.
Choose the Query Engine
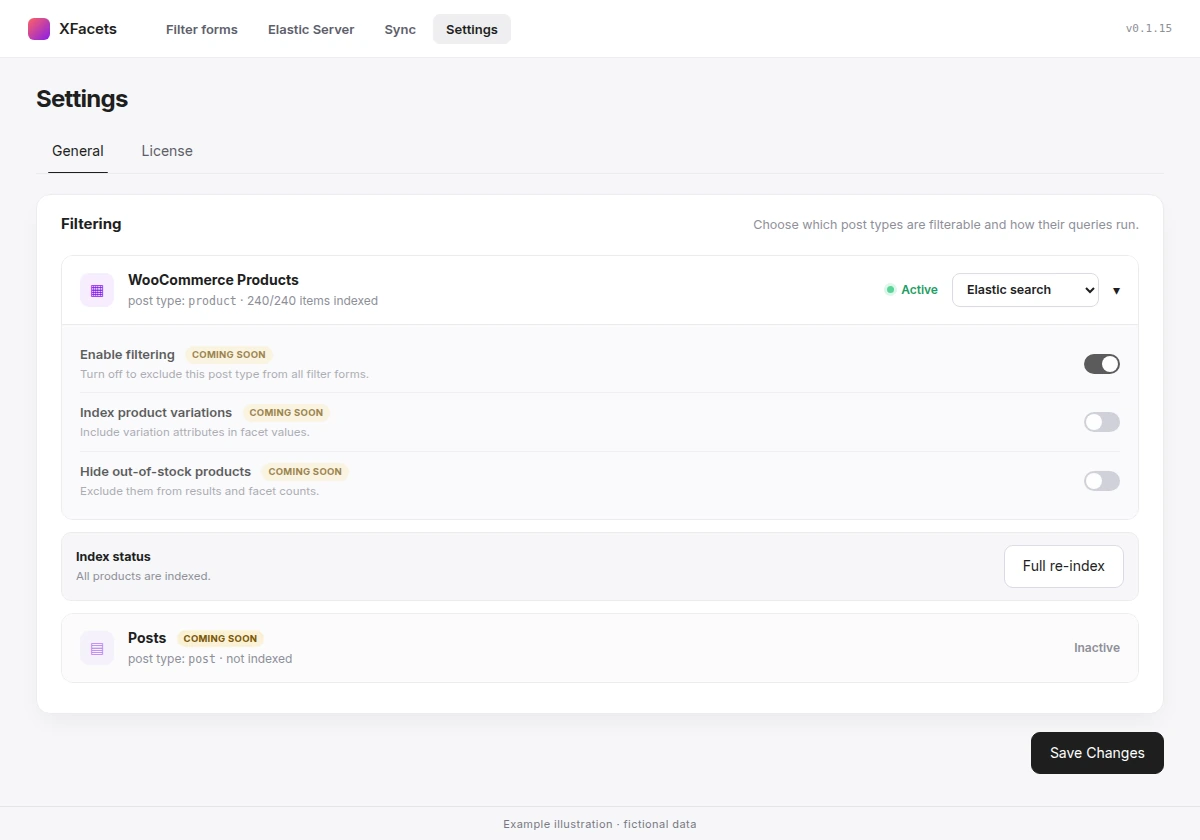
- Go to XFacets → Settings and open the General tab.
- In the Filtering card, set WooCommerce Products to Elastic search. WP Query is the default.
- Click Save Changes.
Elastic search can be chosen once a managed environment is assigned. If the managed gateway becomes unavailable, product queries temporarily use WP Query and return to Elasticsearch automatically when the service recovers.
The Enable filtering, Index product variations and Hide out-of-stock products switches and the Posts row are marked Coming soon and cannot be changed yet.
Run Your First Sync
- Go to XFacets → Sync.
- Click Full Re-index and confirm. Filtering may be incomplete until indexing finishes.
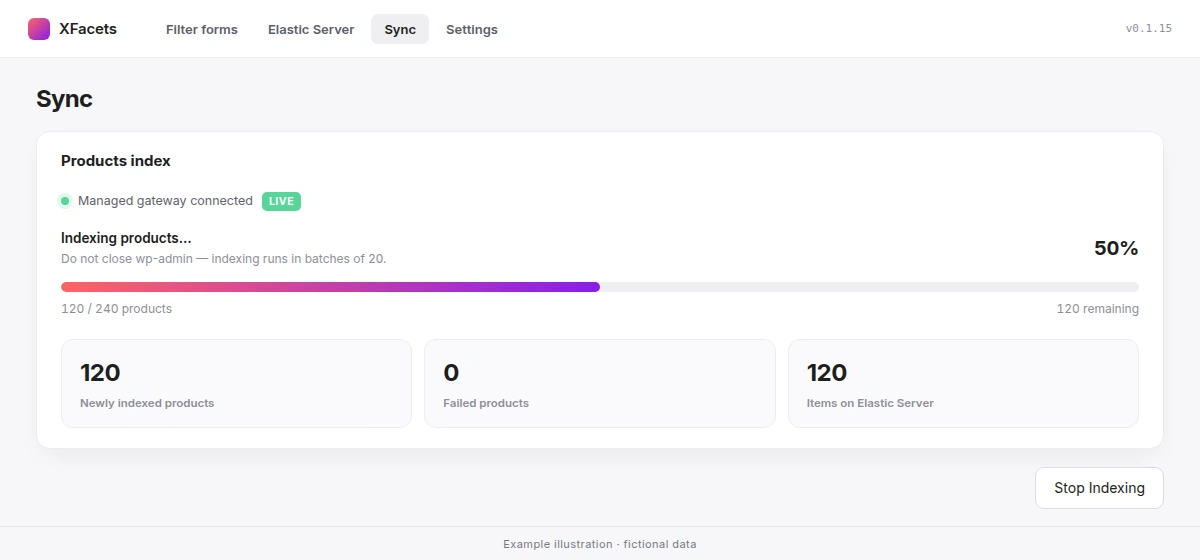
- Keep wp-admin open while products are indexed in batches. Stop Indexing stops the run.
Re-index complete reports indexed and failed products. Max allowed sync items shows how many products your environment can index. See Sync for when to run it again.
Build Your Filters
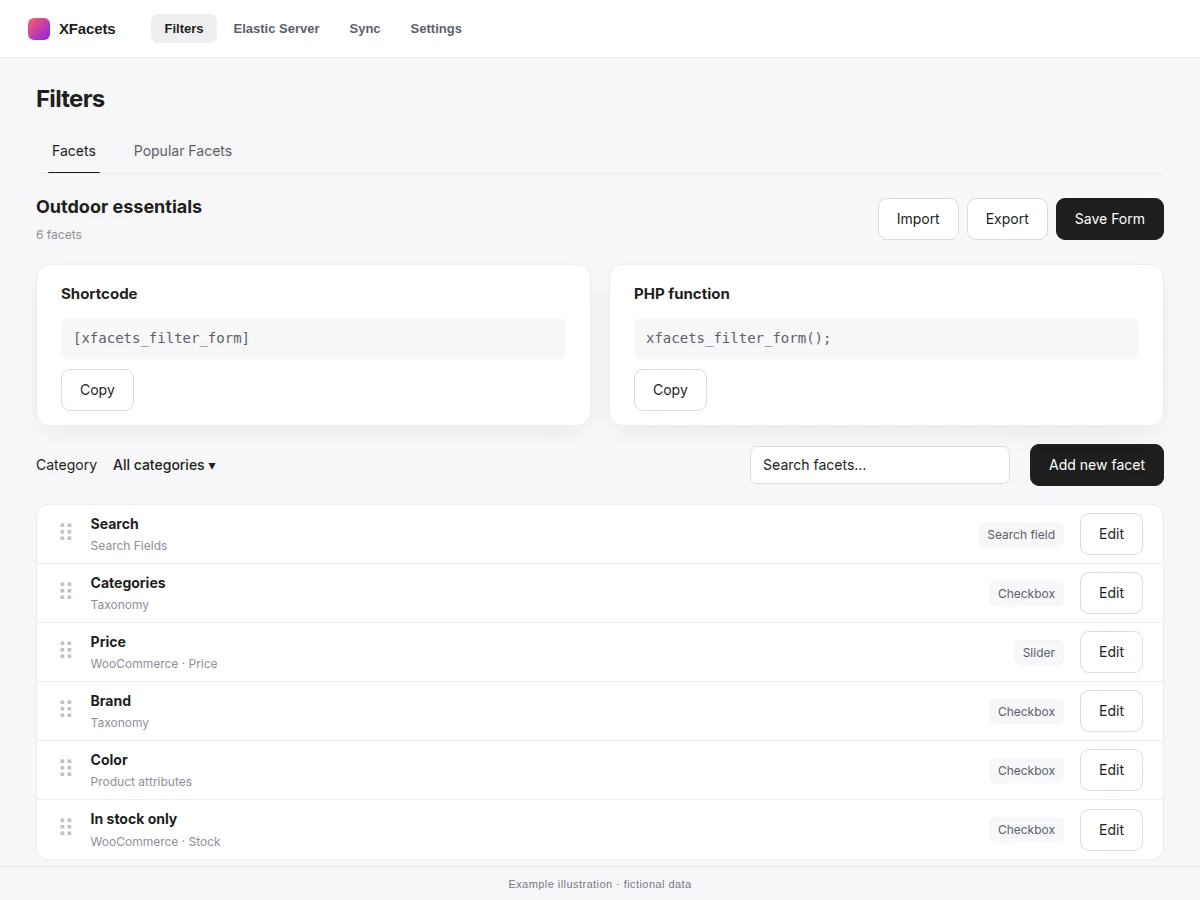
XFacets → Filters opens the store’s Filters on the Facets tab. A site has one set of Filters, used by every placement. A new installation starts with six facets: Search, Categories, Price, Rating, In stock only and On sale. A facet without matching data on your store shows nothing, so the starters can stay while you add your own.
- Click Add new facet.
- Enter a Facet Title, choose a Facet source and Facet value, then a Facet type.
- Click Save in the facet panel. Drag facets to change their storefront order.
Every setting is described under Facets. Save Form saves the Filters’ own settings, such as their name.
Add WPXFacets to a Page
Place the filters and the results on the same page, with shortcodes or the equivalent blocks:
[xfacets_filter_form]
[xfacets_search_results]
Put them in two columns for the usual sidebar-and-grid layout. Display on the Storefront lists every shortcode, block and attribute.
Display on the Storefront
WPXFacets renders through three shortcodes, each with an equivalent block.
| Shortcode | Block | Renders |
|---|---|---|
[xfacets_filter_form] | XFacets Filter Form | The site’s Filters. |
[xfacets_search_results] | XFacets Search Results | The product results for the current filters. |
[xfacets_search_bar] | XFacets Search Bar | The catalog search bar with suggestions. |
Shortcode Attributes
| Shortcode | Attribute | Default | Effect |
|---|---|---|---|
[xfacets_filter_form] | form-id | None | Leave it out. Kept only for older pages: the Filters’ own ID still works, while any other, unknown, deleted or malformed ID shows nothing to visitors and a short notice to editors. |
[xfacets_filter_form] | mobile-display | drawer | drawer shows a Filters button on screens up to 768 pixels wide that opens the filters in a panel. inline keeps them in the page flow. |
[xfacets_search_bar] | class | None | Extra class names for theme styling. |
[xfacets_filter_form mobile-display="inline"]The XFacets Filter Form block shows the same Filters. In a theme template, call xfacets_filter_form();; the PHP function card on the Filters screen shows the call. Several placements on one page show the same filters and drive one product listing.
Where WPXFacets Filters Products
WPXFacets serves the product listing in two places: the WooCommerce Shop page, and any page that contains the XFacets Search Results or Filter Form shortcode or block.
Product category, tag and attribute archives stay with WooCommerce. Filters placed on those archives, for example in a sidebar, do not filter them. To give one category its own filtered page, see Pre-filter a Page.
Facets
A facet is one filter in the Filters: where it reads values, how shoppers use it and when it is shown. Click Edit on a facet to open its panel, which has three groups: Facet details, Facet data settings and Facet display settings.
Facet Details
| Setting | Effect |
|---|---|
| Facet Title | Heading shown above the filter on the storefront. |
| Facet Slug | Generated from the title. It names the facet’s URL parameter, f_{slug}, so changing it changes existing filter links. |
Facet Sources
| Facet source | Facet value | Reads |
|---|---|---|
| Search Fields | None — the facet has its own Search fields | Text a shopper types, matched against the fields you choose. See Search Fields. |
| Taxonomy | A registered taxonomy, such as product categories, tags or brands | Terms assigned to products. |
| Post Meta Keys | The exact meta key | Values stored in that product meta field. |
| WooCommerce | Price, Rating, On sale, Favorites or Stock | WooCommerce product data. Favorites are featured products; Stock counts backorders as in stock. |
| Product attributes | A global attribute from Products → Attributes | Attribute terms assigned to products. |
A new Search facet starts with Title, Excerpt and Content. The Search Bar and other Search facets keep their own fields.
Facet Types
Types that the chosen source cannot use are disabled in the panel.
| Facet type | Shopper uses | Available for |
|---|---|---|
| Checkbox | A list; several values can be selected. | Taxonomy, Product attributes, Post Meta Keys; WooCommerce On sale, Favorites, Stock |
| Radio | A list; one value at a time. | Taxonomy, Product attributes, Post Meta Keys |
| Slider | A two-handle range. | Post Meta Keys; WooCommerce Price, Rating, Stock |
| Single custom range (min/max inputs) | Minimum and maximum fields. | Post Meta Keys; WooCommerce Price, Rating, Stock |
| Search field | A text input. | Search Fields |
| Rating | Star rows with “& up”. | Post Meta Keys; WooCommerce Rating |
Display Settings
| Setting | Options and effect |
|---|---|
| Display this filter | Always, Never or Search results only (shown only on results for a Search Bar query). |
| Show a limited number of filter terms | Checkbox and Radio lists, except On sale, Favorites and Stock. Shows the first values and See more. |
| How many items | How many values are shown before See more. |
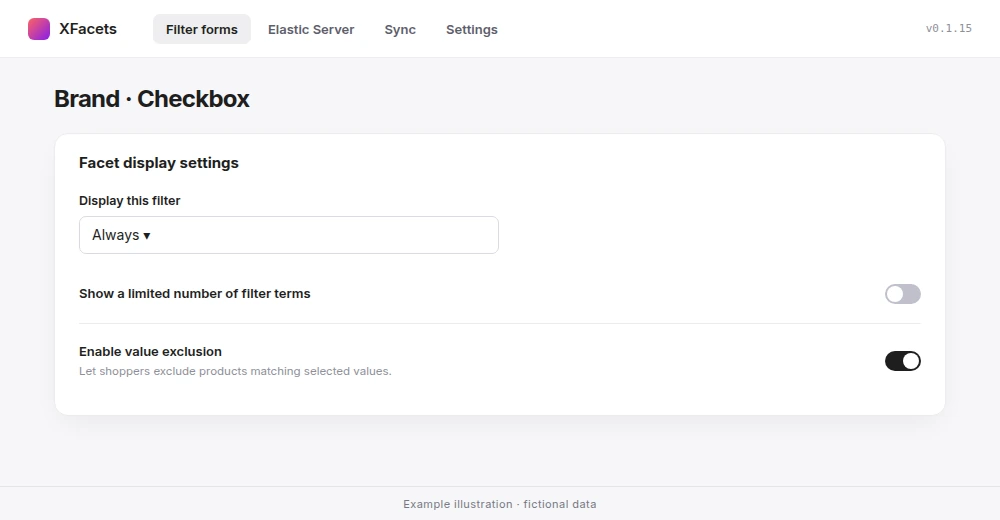
| Enable value exclusion | Checkbox facets only. See Include and Exclude Values. |
Display this filter controls display only. A facet set to Never still applies a value from the page URL to the results, which is how a page is pre-filtered — see Pre-filter a Page.
Include and Exclude Values
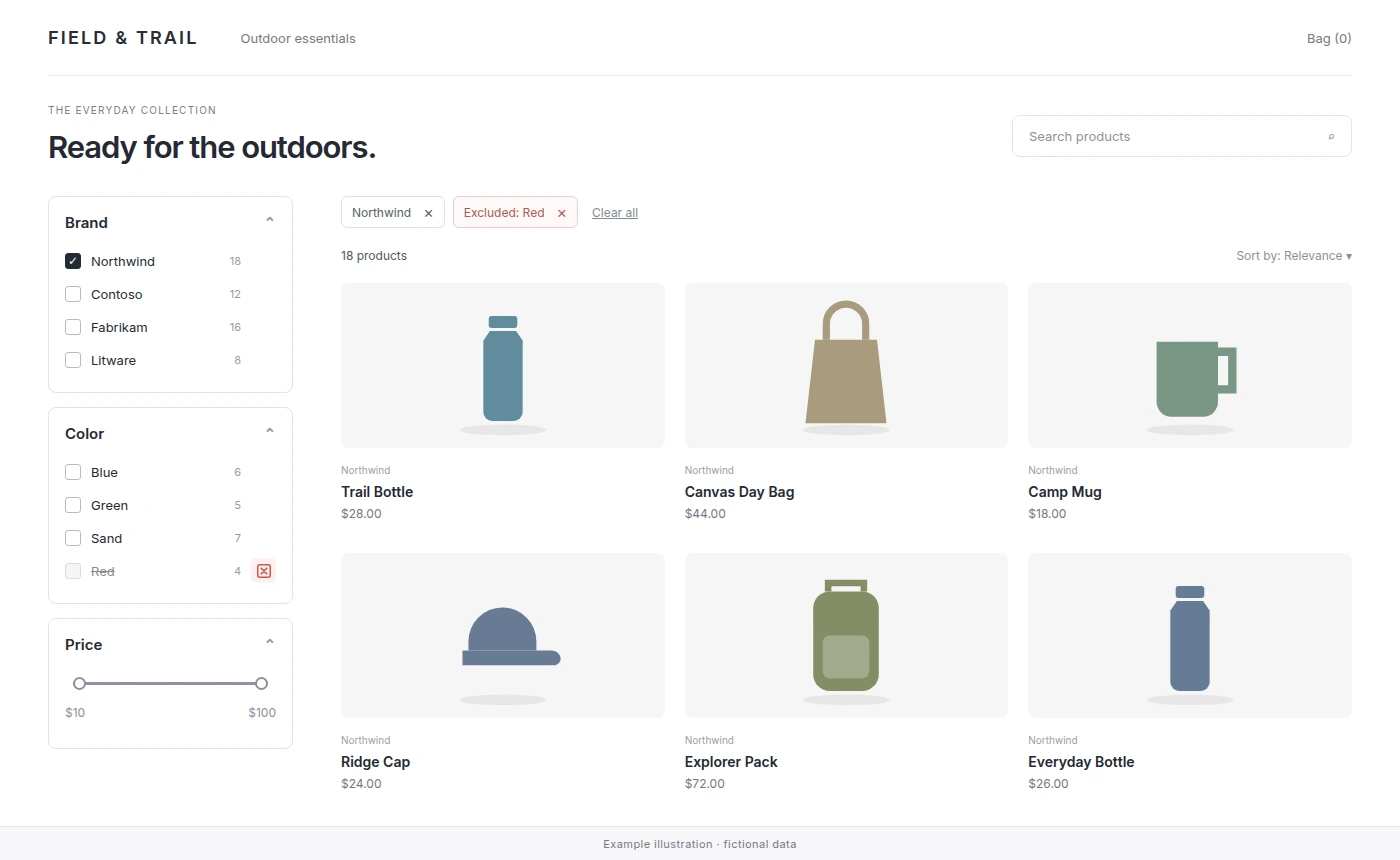
A checkbox value normally includes products: selecting a brand shows that brand. With Enable value exclusion, shoppers can also exclude a value, for example to hide one brand.
- Edit a facet whose Facet type is Checkbox. Any source qualifies, including the WooCommerce On sale, Favorites and Stock values.
- Turn on Enable value exclusion and click Save. It is off by default.
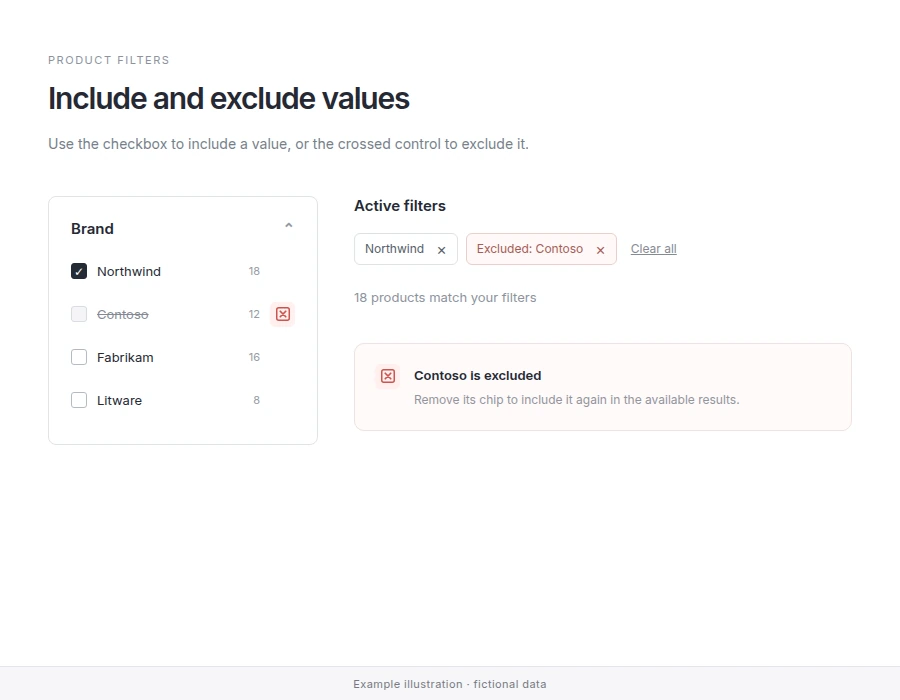
- Each value gets an exclude control beside its checkbox, announced as Exclude {value}. With a mouse it appears on hover or keyboard focus; touch screens show a larger control.
- A value is either included or excluded, never both.
- Excluded values appear in the active filters as Excluded: {value}. Selecting the chip removes that exclusion.
- Clear all removes the selections and exclusions of the filters shown on the page. Filters that are not displayed keep their values, so a pre-filtered page keeps its scope.
- Exclusions are stored in the URL as
f_{slug}_excluded, so shared links, reloads and the browser’s Back and Forward buttons keep them. - The setting only controls the exclude button. An exclusion that arrives in the URL applies even when the setting is off.
- Exclusion works with both query engines, Elastic search and WP Query.
URL Parameters
| Parameter | Meaning |
|---|---|
f_{slug} | Selected values, comma-separated: ?f_brand=northwind,contoso. Range facets take two numbers: ?f_price=10,100. |
f_{slug}_excluded | Excluded values, in the same format. |
f_sort | The sort order of the results. |
f_page | The results page. |
xfacets_q | The Search Bar query. |
Developers can change the f_ prefix with the xfacets_url_facet_prefix filter.
Pre-filter a Page
A pre-filtered page shows part of the catalog, for example one category, while shoppers filter within it. It uses the store’s Filters plus one facet that holds the page’s scope and is not displayed.
Add a Hidden Category Facet
- In XFacets → Filters, click Add new facet. Choose Taxonomy as Facet source and the product category taxonomy as Facet value.
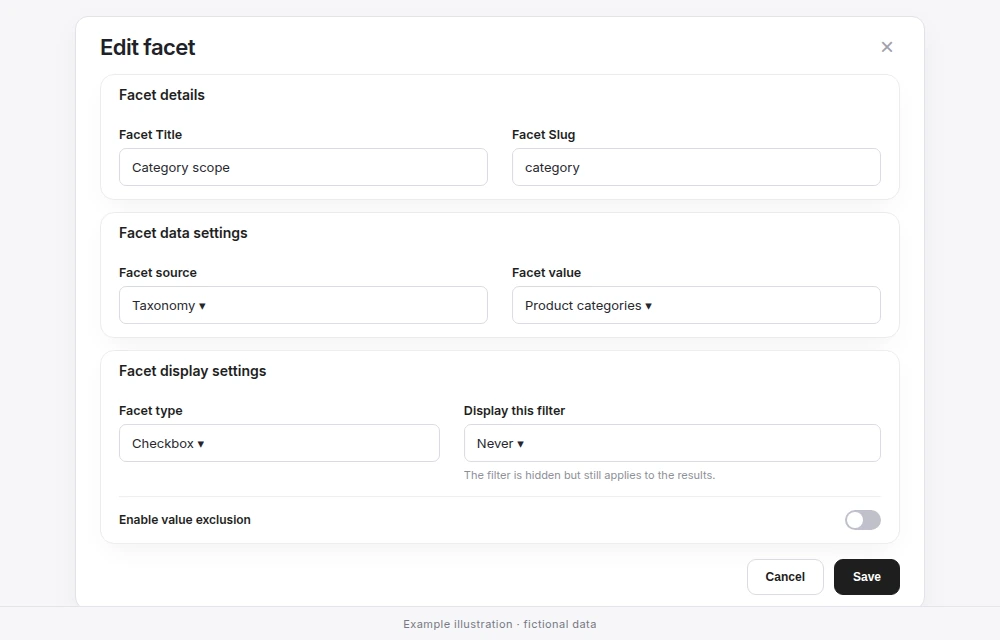
- Give it a Facet Title such as “Category scope” and set the Facet Slug, for example
category. The slug makes the URL parameterf_category. - Choose Checkbox as Facet type, set Display this filter to Never and click Save.
Keep your visible Categories facet for browsing; the hidden facet only holds the page’s scope. Add the hidden facet to the store’s Filters, edited under XFacets → Filters; the first page load and every refinement use them.
Link with a URL Parameter
Put the category’s term slug in a link to any page with the XFacets shortcodes or blocks:
/catalog/?f_category=sofas
/catalog/?f_category=sofas,armchairs
Several values are comma-separated and match products in any of them. The page shows only those products, with no control for the hidden facet. This is the quickest option for campaign or internal links.
Friendly Category URLs
For URLs such as /catalog/sofas/, add a rewrite rule in a site plugin or your child theme. One page and one rule serve every category; no page, template or setting per category is needed.
// /catalog/{category}/ shows the "catalog" page scoped to that category and its subcategories.
add_action( 'init', function () {
	add_rewrite_rule( '^catalog/([^/]+)/?$', 'index.php?pagename=catalog&shop_category=$matches[1]', 'top' );
} );

add_filter( 'request', function ( $vars ) {
	global $wp;
	parse_str( (string) $wp->matched_query, $route ); // the category comes from the path only
	if ( empty( $route['shop_category'] ) || ! is_string( $route['shop_category'] ) ) {
		return $vars;
	}
	$term = get_term_by( 'slug', sanitize_title( $route['shop_category'] ), 'product_cat' );
	if ( ! $term ) {
		return array( 'error' => '404' ); // unknown category
	}
	$slugs = array( $term->slug );
	foreach ( get_term_children( $term->term_id, 'product_cat' ) as $child_id ) {
		$child = get_term( $child_id, 'product_cat' );
		if ( $child && ! is_wp_error( $child ) ) {
			$slugs[] = $child->slug;
		}
	}
	$vars['f_category'] = implode( ',', $slugs ); // f_ + the hidden facet's Facet Slug
	return $vars;
} );catalogis the slug of the page with the XFacets shortcodes or blocks;f_categoryisf_plus the hidden facet’s Facet Slug.- The category comes from the path. A query string added to the friendly URL cannot replace it, and an unknown category shows the 404 page.
- After adding the code, go to Settings → Permalinks and click Save Changes once so WordPress loads the new rule.
- WordPress still treats every category URL as the catalog page, with that page’s title and canonical URL. Adjust them with your SEO plugin or theme if category URLs should be indexed separately.
Categories and Subcategories
A facet value matches products assigned to that exact term; the index does not add subcategories by itself. The code above therefore pins the category and all its subcategories, so /catalog/furniture/ also shows products filed only under Sofas. To pin only the exact category, remove the get_term_children() loop.
Popular Facets and a category’s own facet order apply only when the hidden facet has exactly one selected category. A scope with subcategories uses the shared order and is not counted in Popular Facets; an exact-category scope gets both.
What Shoppers Can Change
- The hidden facet is the page’s scope. The first page load reads it from the path or URL; the browser keeps it and sends it with every refinement. Clear all, reload, sorting, paging and the browser’s Back and Forward buttons keep it.
- Displayed facets are shopper filters, even when a link pre-selected their value: Clear all and Back can remove them. Use a hidden facet for anything that defines the page.
- Search results only shows the facet only on Search Bar results, with the pinned value selected so shoppers can widen the search; elsewhere it behaves like Never.
Pre-filter Limits
- Pre-filtering is navigation, not access control. The scope travels in public URLs and requests, so it can be changed; keep products private in WooCommerce instead.
- Product category, tag and attribute archives are not filtered by WPXFacets; build a page instead.
- Use the shortcode without
form-id. A shortcode naming another form shows nothing to visitors. - Changing the Facet Slug renames the URL parameter; update links and rewrite code with it.
- A value that no product carries shows an empty grid without a visible reason, so check values before linking. Without a scope, the page shows the whole catalog.
Filters
XFacets → Filters edits the store’s Filters. The header holds their name and number of facets, and the Import, Export and Save Form buttons.
- The Shortcode and PHP function cards show the shortcode and template call; Copy copies them.
- In the Facets list, drag a facet or use the keyboard to reorder it; the order is reflected on the storefront. Search facets… narrows the list.
- The Category selector sets the order: All categories edits the shared order, and a selected category gets its own order, used on pages whose hidden category facet selects that category.
- Export downloads the Filters and their facets as JSON. Import replaces the current Filters with an export of up to 2 MB and creates its facets anew; a file without facets is refused, so an import cannot empty the Filters.
Popular Facets
Popular Facets shows which filters shoppers use in each product category and can suggest an order for them. It works without a managed environment and keeps its statistics in your WordPress database: nothing is sent to WPXFacets or to the managed service. It is separate from Search Analytics. Before version 0.1.15 this tab was under Settings.
Turn On Collection
- Go to XFacets → Filters and open the Popular Facets tab.
- Turn on Collect Popular Facets statistics on this site and confirm. Counting starts immediately.
- Visitors get the first-party cookie
xfacets_pf_session. It holds no account, IP address or device data and ends 30 minutes after the last activity, 4 hours at most. Add it to your cookie notice: you manage cookie consent on your site. - A consent plugin that supports the WP Consent API can refuse collection for a visitor; developers can add their own refusal with the
xfacets_facet_usage_server_consentfilter. - A category report needs pages whose hidden or Search results only category facet, in the Filters, has exactly one selected category. Store pages without a fixed category are counted under No cat. Managers’ visits are not counted, and sorting, paging, Clear all and filters preset by a link are not counted as filter use.
- Turning collection off stops counting and keeps the data; Delete collected data removes it. Category orders you applied stay.
- A database copied to another address does not collect until collection is turned on there.
Read a Report and Apply an Order
Choose a Category, a Language and a Period. The report shows eligible sessions, how often each filter was used, the Current order and the Suggested order, and Export CSV.
- A suggestion needs at least 100 eligible sessions; Search facets keep their configured position. Usage reflects the current presentation, so treat it as a signal, not proof of the best order.
- Apply suggested order changes only that category and language. Restore configured order returns the category to the shared order and removes its pins.
- For No cat, Apply to default order changes the shared default order of the Filters.
- You can also order a category by hand, without statistics, with the Category selector in the Facets list.
Swatches
Version compatibility
Swatches is not included in version 0.1.15. This section describes the interface and styling in version 0.1.17.
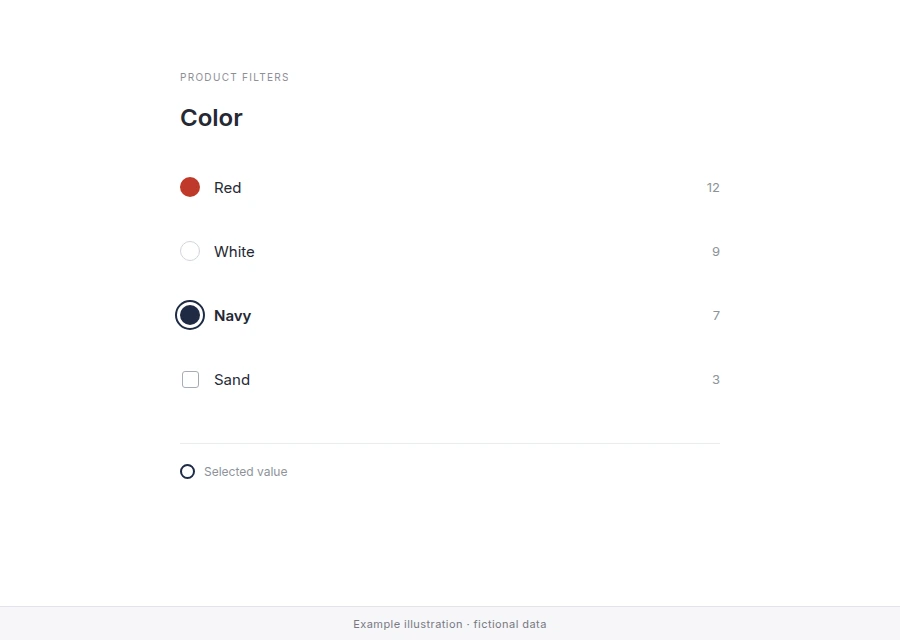
Swatches show a color or a small image beside a filter value, for example a red dot next to Red. The library is shared by the site’s Filters, and each facet opts in separately.
Create a Swatch
- Go to XFacets → Filters and open the Swatches tab.
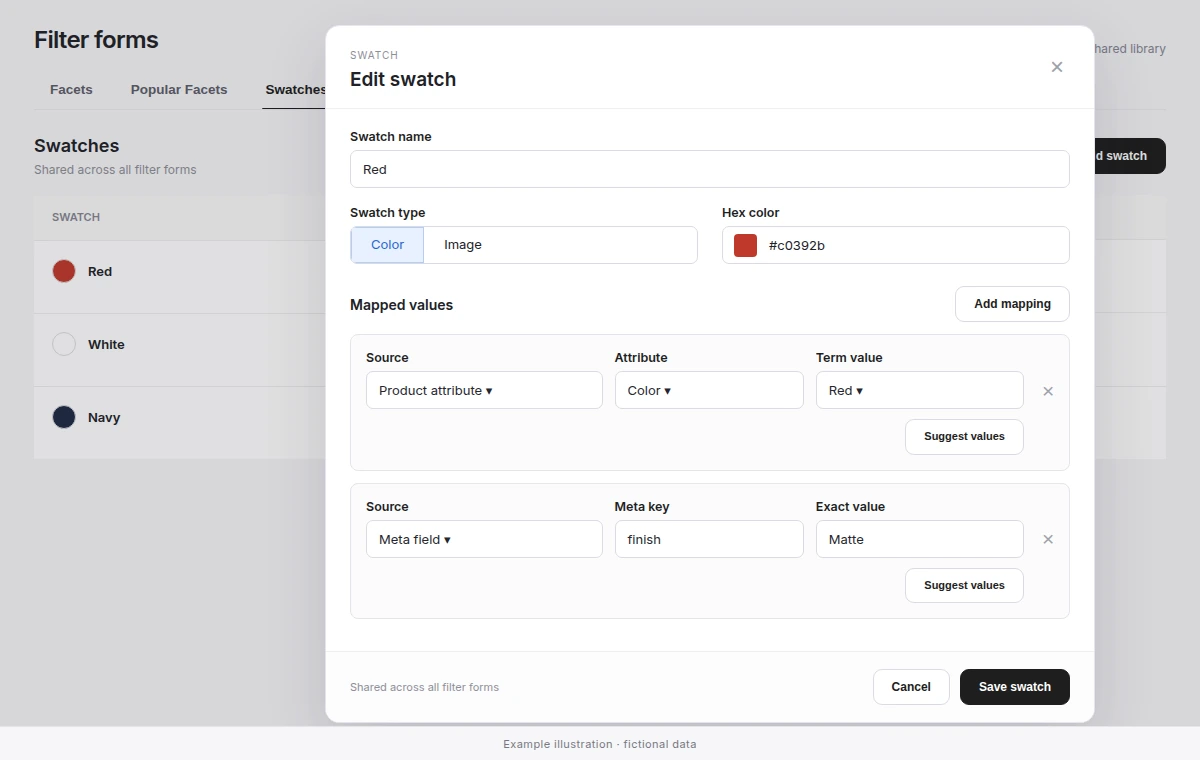
- Click Add swatch, enter a Swatch name and choose a Swatch type: Color with a Hex color, or Image with Choose image (JPEG, PNG, WebP or GIF from the Media Library).
- Under Mapped values, click Add mapping and choose the Source: Product attribute with an Attribute and Term value, or Meta field with a Meta key and Exact value.
- Click Save swatch.
- Suggest values lists existing values. When a long list is not complete, Search further continues it; you can always type the exact value instead.
- Attribute mappings follow the term, so renaming its slug keeps the swatch. Meta values match exactly, including letter case, spaces and 0.
- A value belongs to at most one swatch. The library holds up to 200 swatches, 25 mappings per swatch and 1,000 mappings in total.
- Deleting a swatch removes only its mappings; products, values and Media Library images stay.
Show Swatches in a Facet
- Edit a facet whose Facet source is Product attributes or Post Meta Keys and whose Facet type is Checkbox or Radio.
- Turn on Use swatches for mapped values and click Save. It is off by default.
- Mapped values show their swatch beside the unchanged label and count; other values keep their normal checkbox or radio.
- Selecting, excluding, Clear all, links and counts work as before. A missing or deleted image falls back to the plain value.
- Swatches need no re-index and work with both query engines.
- Swatches decorate filter values only; they do not show which color and size combinations are in stock.
Import, Export and Recovery
- Export on the Facets tab includes the swatch library. Import adds swatches to the existing library and keeps the ones you have; a different visual for the same value refuses the import before the Filters change.
- Attribute mappings are matched on the destination site by taxonomy and term slug, meta mappings by exact key and value. Values that do not exist there yet are kept and reported, and a later import can complete them.
- Images are reused only when the file is already in this site’s Media Library. Images from another site are never downloaded: they show Image from another site — choose an image or Image missing until you choose a replacement.
- The import report counts swatches added, values added, images to choose and values not found.
- Uninstalling the plugin keeps the filter configuration, including the swatch library.
Theme Styling
Swatch rows are transparent: the plugin adds no background and no border around a color. A white or very light swatch can therefore disappear on a light page, so add a border in your child theme for the values that need it. Each color swatch carries its exact value in data-value:
body .xfacets-search-facets .xfacets-facet.facet-color .facet-row
.facet-swatch--color[data-value="white"] {
	box-sizing: border-box;
	border: 1px solid #d1d5db;
}
Replace facet-color with facet- plus your facet’s slug, and white with the values that need contrast. On multilingual stores each language has its own value, for example white and weiss; add a selector for each.
With Swatches, the include control is a native checkbox or radio inside label.facet-checkbox or label.facet-radio, and the exclude button sits outside the label. Theme CSS written for the older div.facet-checkbox markup needs updating.
Elastic Server
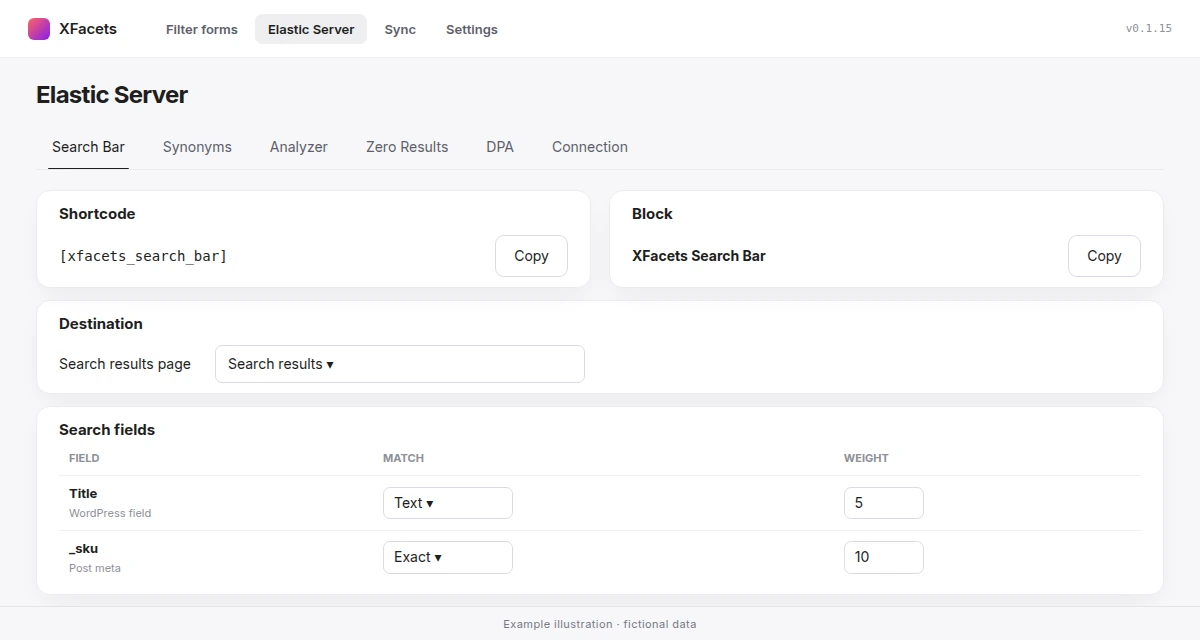
XFacets → Elastic Server holds search configuration and the managed connection. It opens on Search Bar.
| Tab | Purpose |
|---|---|
| Search Bar | Results page, search fields and suggestion behavior of the Search Bar. |
| Synonyms | Query-time synonym rules, CSV import and export, and deployment. |
| Analyzer | Marked Coming soon; nothing to configure yet. |
| Zero Results | Searches that returned no products. See Search Analytics and Zero Results. |
| DPA | Review and accept the Data Processing Agreement for analytics features. |
| Connection | Managed connection, environment and Sync Batch Size. See Connect the Managed Environment. |
When the page shows Elastic Server is currently unavailable, you can keep editing local settings; operations that contact Elasticsearch, such as deploying synonyms, wait until the service is back.
Search Bar
- Add
[xfacets_search_bar]or the XFacets Search Bar block where shoppers search, usually the site header. The Shortcode and Block cards copy either one. - Under Destination, choose the Search results page: a page containing XFacets Search Results. Pages without it are marked Missing XFacets Search Results. Use WooCommerce Shop fallback sends searches to the Shop page.
- Set the Search fields and Behavior, then click Save all changes.
| Behavior setting | Default | Range | Effect |
|---|---|---|---|
| Placeholder | Search the store… | Up to 100 characters | Shown before the visitor types. |
| Minimum characters | 3 | 1–10 | Below this, the dropdown stays in its zero state and no request is sent. |
| Completions | 6 | 1–12 | Term suggestions derived from the product catalog. |
| Product rows | 5 | 1–10 | Product matches shown beside the completion suggestions. |
Restore defaults resets the tab after a confirmation. A low Minimum characters value sends a request on almost every keystroke.
A search opens the results page without the current filters; shoppers then refine the results there. Recent searches, kept only in the visitor’s browser, a “Did you mean” correction when nothing matches exactly, and featured products in the empty dropdown are always on. Use the arrow keys to move through suggestions, Enter to search and Esc to close.
| Shoppers see | Meaning |
|---|---|
| “Suggestions are paused briefly. Press Enter to search.” | Too many requests in a short time. |
| “Suggestions are temporarily unavailable. Press Enter to search.” | Suggestions cannot be loaded right now; pressing Enter still opens the results. |
| “Nothing matched …” | No product or completion matched; check search fields and synonyms. |
Pressing Enter always opens the results page. If the bar cannot be shown at all, visitors see nothing in its place and logged-in editors see a short message explaining what is missing, such as a missing results page.
Trending Searches
The empty dropdown shows a Trending searches list that you write. It is never generated from visitor searches, so it is useful from the first day and holds no shopper data.
- In Trending searches, click Add entry.
- Choose an Entry type: Text query, or Taxonomy term for a public product taxonomy term. Optionally set a Display label.
- Drag entries into order and click Save all changes.
Each language holds up to 12 entries, with labels and queries of up to 100 characters. If an entry returns no products, saving warns with Some Trending entries return no products.
Search Fields
The Search Bar and each Search facet have their own list of up to 20 fields. A product matches when any field of that list matches; separate search inputs must all match. Weights from 0.1 to 100 change ranking, not which products match. WP Query searches words without relevance ranking or typo tolerance.
| Match | Behavior | Available for |
|---|---|---|
| Text | Full-text match with typo tolerance on Elasticsearch. | All fields |
| Exact | The whole value must equal the query, ignoring letter case. | Title, meta fields, taxonomies, product attributes |
| Prefix | The whole value must start with the query, ignoring letter case. | Title, meta fields, taxonomies, product attributes |
Exact suits codes: a _sku field set to Exact finds AB-100 without also matching AB-1000. Restore default fields returns to Title (5), Excerpt (2) and Content (2), all Text.
- Sources are WordPress fields (Title, Excerpt, Content), product meta keys, taxonomies and product attributes. Price, rating and stock are filters, not search fields.
- Type a meta key exactly. A key the product index does not store is refused when you save.
- Field, weight and match changes apply to the next search. A value that products have not been indexed with yet appears after they are saved again or after a Full Re-index.
Upgrading from a version before 0.1.15
Search facets saved before fields became independent have no field list and match nothing until you open them, choose their Search fields and save. The Search Bar keeps its other settings and starts from the default fields.
For step-by-step setup and examples of descriptive search, complete SKU lookup and code prefixes, see Configure search fields and matching modes.
Synonyms
Synonyms teach search that different words mean the same thing: a shopper searching “couch” also finds products titled “sofa”. Rules apply when a search is analyzed: title, excerpt and content use deployed rules immediately, meta and taxonomy fields after the next full sync.
| Rule type | Behavior | Use it for |
|---|---|---|
| Equivalent | All terms match each other, in both directions. | Words that mean the same thing to shoppers: sofa, couch, settee. |
| Directional | The left side expands into the right side only. | A brand that should also find a category: northwind → faucet, tap. |
- Click Add synonym and choose the Rule type.
- For Equivalent, enter at least two words in Terms. For Directional, fill Terms to expand and Expands into.
- Check the Rule preview and click Save rule. The rule is Pending.
- Click Deploy to Elasticsearch. When the tab shows All rules are live, the next search uses the rules.
- Terms are lowercased and trimmed on save. A rule holds up to 50 terms of up to 64 characters; = and > are not allowed in a term.
- A term used in two rules marks both as Conflict. Elasticsearch merges them, which can widen results.
- Rules belong to a Catalogue language and affect only the current environment. To use tested rules on Main, Export CSV here and Import CSV on Main.
- Synonyms require Elasticsearch; WP Query does not use them.
Synonym CSV Import
Import CSV accepts a UTF-8, comma-delimited file of up to 5 MB. Exported files have the columns language, type, terms, target and enabled; only type and terms are required. Without a language column, rows go to the selected catalogue language.
type,terms,target,enabled
equivalent,"sofa, couch, settee",,1
directional,northwind,"faucet, tap",1
Merge adds new rules and updates matching ones. Replace all deletes every current rule first and cannot be undone. The result lists added, updated, unchanged and rejected rows with their line numbers. Deploy afterwards.
Search Analytics and Zero Results
Search Analytics records storefront searches that return no products, so you can add missing words, synonyms or products. Unlike Popular Facets, it runs on the managed service: the daily aggregates are stored with your managed environment, not in WordPress. It is off by default. Product search, filtering and category order never depend on it.
Turn On Search Analytics
- Work on the Main / Production environment. Secondary environments never collect; they can only read Main’s report, labeled Data from Main.
- On Elastic Server → DPA, review and accept the current Data Processing Agreement. Accepting it does not start collection.
- On the Zero Results tab, click Activate Search Analytics and confirm.
- Only deliberate searches submitted from the Search Bar count; typing that shows suggestions does not. Searches are kept as daily aggregates for 90 days, without a visitor identifier, and are not shared with other stores.
- Search terms can contain personal data even though common sensitive patterns are rejected. Turn collection on only when your privacy notice covers it.
- Turning it off stops collection and keeps the data; Delete analytics data removes it. Deactivating the license also stops collection.
Read the Zero Results Report
Choose a Period of 7, 30 or 90 days, a Language and a Result type: No results when the search itself found nothing, or No results after filters when it found products but the selected filters left none. Sort by Most searches, Most recent or Query A–Z.
On a row, Add synonym opens the Synonyms editor with the search term filled in; finish the rule, save it and deploy it. The report is a merchandising signal, not audited traffic.
Sync
XFacets → Sync rebuilds the product index from your catalog with Full Re-index. After the first sync, changes to products, reviews and terms are indexed when they are saved.
Run Full Re-index when:
- the environment is new, or Full product sync required appears after changing environments;
- Index status on Settings → General reports items that are not indexed;
- you changed the Search Bar’s search fields and want completion suggestions to use them — product results use the new fields immediately;
- products were changed outside normal WordPress saves, for example by a direct database import.
The screen reports Newly indexed products, Failed products, Items on Elastic Server, Total indexed items and Max allowed sync items. Wait for a running sync to finish before changing environments.
WP-CLI
WPXFacets adds wp xfacets commands to WP-CLI. Use them to rebuild the product index and check the connection from a shell, for example on a large catalog or in a deploy script. A rebuild uses the same re-index as Full Re-index on the Sync screen, so no browser tab needs to stay open.
Before you start:
- shell access to the server that runs WordPress, with WP-CLI installed;
- WPXFacets installed and active on that site;
- for indexing, the same setup as a sync in wp-admin: an active license and an environment assigned in Elastic Server → Connection.
Run the commands from the WordPress root directory, or add --path with that directory from anywhere else.
cd /srv/shop
wp xfacets server status

# From another directory
wp xfacets server status \
  --path=/srv/shop
Rebuild from the Command Line
wp xfacets index rebuild indexes the whole catalog in one process and shows a progress bar. It asks for confirmation first; add --yes in scripts. Before starting, it checks the plan’s indexed-product limit and prints it. A running rebuild also appears on the Sync screen.
wp xfacets index rebuild --yes

# Smaller batches, this run only
wp xfacets index rebuild \
--batch-size=50 --yes--batch-size=<n>sets the products per batch for this run only. The batch size used by the Sync screen does not change.--show-errorsprints each failed product as it happens. Without it, up to ten failures are listed at the end.- If another re-index is running, from wp-admin or another shell, the command stops and says so. Wait for it to finish or stop it with
wp xfacets index cancel. A run that stopped responding, such as a closed browser tab, no longer blocks a new rebuild after at least two minutes without progress. --forcestarts a new rebuild anyway. It discards the running re-index’s progress and starts again from the first product; it does not resume. Use it only when the other run should be abandoned. It does not override an error from the managed service, such as a plan or environment problem: fix the reported cause first.wp xfacets index cancelstops a running re-index after its current batch. The rebuild is then unfinished; run it again to complete it.
To index only specific products, pass their IDs to wp xfacets index item, for example wp xfacets index item 412 918. Products beyond the plan’s limit are reported as not indexed.
Check Index and Connection Status
wp xfacets index status shows the current or last re-index: its state (running, completed, completed with failures, abandoned or cancelled), what started it, products processed, indexed and failed, timing and batch size.
In scripts, note two limits. Before the first re-index, index status prints a sentence instead of a table, even with --format=json. And completed alone does not prove that the last rebuild finished: when its final step fails, the state can be completed with failed at 0 and errors above 0. Check errors too, and rely on the exit status of index rebuild.
wp xfacets server status checks the connection to the managed service. It shows whether the site is connected, the transport, products_in_wordpress and, when connected, documents_in_index. When the site is not connected, it shows error and error_code instead. Add --force to check again instead of using the last cached result.
wp xfacets index status \
  --format=json
wp xfacets server status --forcehost,credentialsandindexalways show the placeholders(managed gateway),(managed entitlement)and(managed assigned slot). The managed service does not expose its servers, keys or index names to WordPress.documents_in_indexshowsunknown (count failed)when the count could not be read. That is not an empty index, so do not rebuild because of it alone.plan_limitshows the limit last stored on the site, without contacting the license server.unlimitedmeans that no positive limit is stored, which includes a site that has never received one. It is not a fresh check of your plan.
Exit Status in Scripts
index rebuildexits with an error when any product failed to index. With--allow-failuresit exits successfully with a warning instead, but that rebuild is still not put into use: search keeps using the last completed index, if there is one. Leave the flag out of scripts that need a successful rebuild, fix the reported failures and rebuild again.- When no product failed but the rebuild could not be completed,
index rebuildends with an error, even with--allow-failures. index itemexits with an error when any listed product failed.server statusexits with status 1 when the site is not connected, so a script can use it as a health check.
wp xfacets server status \
  && wp xfacets index rebuild --yes
WP-CLI Command Reference
wp xfacets index rebuild
  [--batch-size=<n>] [--force]
  [--show-errors]
  [--allow-failures] [--yes]

wp xfacets index status
  [--format=table|json|yaml]

wp xfacets index cancel

wp xfacets index item <id>...
  [--show-errors]

wp xfacets index delete [--yes]

wp xfacets server status
  [--force]
  [--format=table|json|yaml]
index rebuildrebuilds the product index from the catalog.index statusshows the current or last re-index.index cancelstops a running re-index after its current batch, leaving the rebuild unfinished. It warns when nothing is running.index itemindexes the listed products without a full rebuild.index deletedeletes nothing. It always ends with an error because the managed service does not allow direct index deletion, and--yesdoes not change that. It remains so existing scripts receive that explicit error.server statuschecks the connection to the managed service.
Synonyms, settings, the license and the environment are managed in wp-admin; there are no WP-CLI commands for them.
Hooks and filters
Use the Hooks and filters reference to customize facet values, indexing and search, or react to results in your own code. It lists the supported PHP hooks and browser events, their arguments and practical examples.
Debugging
Use How to debug WPXFacets to inspect the request behind a product listing, try a temporary query in the Playground, and check why a product or SKU is missing. The guide covers Query Debugger access, captured requests, product checks and their limits.
Settings
| Tab | Contains |
|---|---|
| General | The Filtering card with the query engine for WooCommerce products, and Index status with Full re-index. |
| License | License key and License token, the license status and Deactivate. |
Deactivating the license stops Search Analytics collection and revokes the site’s access to the managed service. It does not delete stored analytics; delete them first on the Zero Results tab if they must be removed.
Troubleshooting
| Symptom | What to check |
|---|---|
| Elastic search cannot be selected | Activate the license, then assign an environment in Elastic Server → Connection. |
| The connection shows the service as unavailable | Click Recheck status. Meanwhile product queries use WP Query and switch back automatically. |
| A Search facet returns no products after an update | Open the facet, choose its Search fields and save. |
| The Search Bar does not appear | View the page while logged in as an editor: a message explains what is missing, such as a published results page. |
| Filters do nothing on a category archive | Archives are served by WooCommerce. Use a page with the shortcodes — see Where WPXFacets Filters Products. |
| A new synonym has no effect | Deploy it and wait for All rules are live. |
| Fewer products are indexed than in the catalog | Check Failed products and Max allowed sync items on the Sync screen. |
| Shoppers cannot exclude a value | Turn on Enable value exclusion for that facet; it is available for Checkbox facets only. |
| A pre-filtered page shows the whole catalog | Check that the link or rewrite sets f_ plus the hidden facet’s current Facet Slug, that the value is a term slug and that the facet is in the site’s Filters. |
| A category has no Popular Facets report | Collection must be on, and the page’s hidden category facet needs exactly one selected category. |
| Completion suggestions miss recently edited products | Run Full Re-index. |
| Swatches do not appear | Turn on Use swatches for mapped values for the facet and map its exact values in Swatches. |